Wednesday, May 27, 2009

Hide drive / partitions from Desktop - Ubuntu 9.04

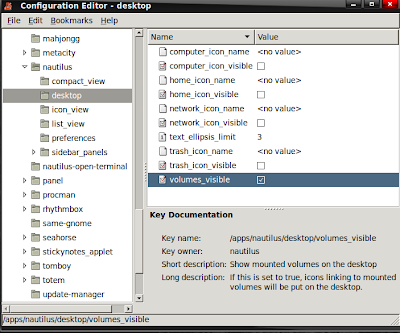
When ever you mount drives / partitions, drive icons will appear in the desktop. If these icons annoying you then simply remove it by using following method. Open Terminal (Applications -->> Accessories -->> Terminal), type sudo gconf-editor and hit enter. This will bring up new window (see screen shot).


In the configuration editor window navigate to apps -->> nautilus -->> desktop. Now you can see volume_visible is enabled on the right side of the window. Disable it by clicking on the tick mark. Thats it.

Mount drives / partitions always (permanently) in Ubuntu 9.04

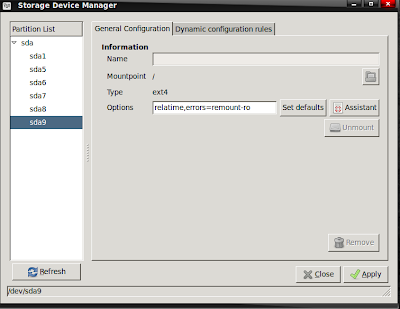
For some reason Ubuntu does not mount drives automatically. i.e other than home folder remaining drives / partitions has to be mounted to view content inside. Though it can be mounted each time when you click on the drives / partitions, it will create problem setting wallpaper from other drives / partitions and songs can not be played directly from albums in Rhythmbox just after boot up. There is an excellent tool to overcome this problem. Open Synoptic Package Manager (System -->> Administration -- >> synoptic Package Manager) search for package "pysdm" and install it (Mark for installation -->> Apply). Once the pysdm package is installed you can open it from System -->> Administration -->> Storage Device Manager. Here is the screen shot...


On the left side of Storage Device Manager you can see sda, sda1,...etc. While clicking on each drive, a new small window will pop up and ask you to enable drive. Just give ok. Do this for all drive. Thats it. Now onwards your drives / partitions will be automatically mounted while booting up on every time.

Note:: By the time you complete this step you could see all your drive / partition icons in your desktop. If you do not want these drive / partition icons to be visible in the desktop then follow this method.


Tuesday, May 26, 2009

How to edit / manipulate a .deb file of a compiled application

First of all, as I mentioned in the title, this post is about how to create or manipulate deb files of an already compiled application. In this topic I’m not going to explain you how to create a deb starting from source code :)

I’ll try to give you every possible indication in this article, if you miss some information but find the article interesting, please comment and ask me how to make things I failed to explain.

Not going to tell you what a .deb file is and what it is for, but you should really know that a deb is just a common archive in an .ar format, camouflaged with another name. So, right clicking on the deb file and choosing to open it with a common compressed files manager (such as file roller in gnome and OpenGEU) will work and show you the contents of the file. Now, you can modify an already existent deb file or create one from scratch. Should you prefer the second option, don’t be scared, it really is a simple task.

A deb file contains two main files, so, to manipulate an existing deb, open it with an archive manager and extract those files wherever you wish. The files we are talking about are:

* control.tar.gz
* data.tar.gz

Now, create a new dir with the name of the applications you’re creating (in reality, the name of this dir means nothing but you may still want the name to have a meaning, just for your convenience..), then, inside of this dir, create a subdir called debian. Now, enter the debian dir and create another sub-dir called DEBIAN. All of this work is case sensitive so use the right letters. The dir structure at this point should look like this:

application_name –> debian –> DEBIAN

Very well now, you can open the file called control.tar.gz

Inside of this file you’ll find some other files, just extract them into the DEBIAN dir as they are. Now open the file called data.tar.gz and extract its contents into the debian dir as they are, with any contained folder and subfolder: in other words, leave the directory structure of the compressed archive unaltered.

Perfect, not we have just recreated the directory structure of the original deb file. Enter the DEBIAN dir, you’ll find there a file called “control” (without quotes, never consider quotes from now on in the article please).

control

This is the main “brain” of a debian file: it contains all of the informations reguarding this package, without this file the entire creation of a deb package has no meaning at all. A control file looks like this (quoting the contents of the opengeu-artwork-usplash’s control file as an example):

Package: opengeu-artwork-usplash
Version: 3.01
Section: x11
Priority: optional
Architecture: all
Depends: libc6 (>= 2.5-0ubuntu1), initramfs-tools (>= 0.40ubuntu30), usplash (>= 0.4-21)
Installed-Size: 1010
Maintainer: darkmaster
Conflicts: geubuntu-artwork-usplash
Replaces: geubuntu-artwork-usplash
Description: OpenGEU usplash image
The startup screen shown on OpenGEU boot, by default it is the Sunshine version, you can later change it to the Moonlight edition too using usplash-switcher.

Let’s analyze the important parts this file together:

* Package: you have to put here the name of the package, never use spaces, never use a version number. It is case sensitive, be warned!
* Version: of course, the version number / code. It can also be, for example, opengeu-3.0.2 or any other weird code, as long as the last part is a number. Always remember that chaning the version to a higher number triggers the system to consider that new file as an update of course!
* Priority: optional, high, low, only system or security updated should have something like high in the priority.
* Architecture: i386, amd64, all, you should specify here what platform this package is compiled for. If it is only an artowork or a metapackage, you can put all in the Architecture field.
* Depends: a list of all the packages this package depends on. A metapackage, for example, can include almost nothing but depend on a lot of other packages so that installing this metapackage automatically installs a lot of other packages! That’s what happens with opengeu-desktop for example!
* Conflicts: if you know that your package can’t work if another package is installed, well, you should then list that package here.
* Replaces: Here you specify that this file replaces another package, maybe an old one. Useful if you change the name of the package into something else and whant the new package to be installed INSTEAD of the package to be replaced.
* Description: put only a very short description in the first line, then enter a longer description on the second line, like it is shown in the example above.

Well, and that’s almost eveything about the control file. But this is not the only file you can find in the DEBIAN dir. For example, you could find also a prerm or postinst file, or you could find both of them: they are scripts.

postinst

This script will execute any action contained in it right after the installation of the package. Here’s an example, the contents of the postinst file contained in the opengeu-artwork-usplash package:

#!/bin/sh

set -e

case “$1″ in
configure)
update-alternatives –remove usplash-artwork.so /usr/lib/usplash/usplash-theme-opengeu-sunshine.so
update-alternatives –install /usr/lib/usplash/usplash-artwork.so usplash-artwork.so /usr/lib/usplash/usplash-theme-opengeu-sunshine.so 55
update-alternatives –install /usr/lib/usplash/usplash-artwork.so usplash-artwork.so /usr/lib/usplash/usplash-theme-opengeu-moonlight.so 55
update-alternatives –set usplash-artwork.so /usr/lib/usplash/usplash-theme-opengeu-sunshine.so
update-initramfs -u
;;
esac

So, right after the installation o the package, those commands are executed, very simply!

prerm

This script instead is executed right before the package is removed! Here are teh contents of the prerm file contained in the opengeu-artwork-usplash package:

#! /bin/sh

set -e

case “$1″ in
remove)
update-alternatives –remove usplash-artwork.so /usr/lib/usplash/usplash-theme-opengeu-sunshine.so
update-initramfs -u
;;
esac

If you are creating a new deb file from scratch, remember to right click on those files, move the permission tag and make them executable, or they won’t work.

Keeping the folders clean

Every time you create or modify a new text / script file, some temporary files are created and we don’t want them to go into the deb. So enable your file browser to see hidden files and remove the temporary files before compiling the deb!

Data

Every file that has to be installed into the system goes into the debian folder. Let’s say that this is like the heart of our deb package. Consider this folder as the “/” mount point of your system, the main system folder or whatever you call it. Basically, you have to recreate into the debian folder the structure of the folders and files you wish to be installed into the system. So, let’s say that our package has to install the usplash-theme-opengeu-moonlight.so file into the /usr/lib/usplash/ folder, then, you’ll have to create or edit the files and folders status to look like this:

package-name/debian/usr/lib/usplash/usplash-theme-opengeu-moonlight.so

Installing the deb file will cause the usplash-theme-opengeu-moonlight.sot o be copied in the right place :)

You can of course add multiple files into the same package with multiple folder structures but remember that if you create a package containing the same files as another already installed package, and if this new package is not an upgrade to the other one, the installation will fail. apt-get will give you an error saying that the file is already contained in another package and therefore it cannot be overwritten.

Creating the real package

Now that we created the contents and the controls of the package, let’s build it so that a deb file is created for us automatically. Move yourself in the main folder of the application, in our example, it should be the “package-name” folder. Open a terminal here and run:

sudo dpkg-deb -build debian

You’ll be asked to install some extra packages the first time you use this command, just do it and then run the command again. A debian.deb file will be created in the dir you are in, just rename it to mirror your tastes, I suggest you to try and name it with the same name you mentioned in the control file, followed by the file version, for example: opengeu-artwork-usplash-3.0.deb and remember never to use spaces!

Conclusions

The file is now ready to be installed. In this way and knowing the files structure you can create any new deb from scratch or edit an existent one, no difference. Just use any control file as a template. Remember to keep your folder structure clean and that it is case sensitive and you’ll soon create nice deb packages :-)

Note: Above article is republished here with the permission of original author. Author and the original post can be found here

Monday, May 25, 2009

Reliance Net Connect on UBUNTU / KUBUNTU 9.04 by using ZTE MG880 Modem (With out wvdial)

If you google around for configuring your reliance USB modem on ubuntu / kubuntu 9.04 then almost all links will lead to wvdial configuration. But there is also another way of doing it with out touching wvdial is by using pppconfig. This post is not restricted to ZTE MG880 Modem. To avoid confusion and errors please copy and paste commands. Here we go...

Note:: 1. Screen shot have been taken from Kubuntu but procedure is same for Ubuntu too.

1. Firstly we will have to find out modem vendor id and product id. Use the following command to find it.

sudo lsusb -v

You can see the output like this...

Bus 002 Device 009: ID 19d2:fffd
Device Descriptor:
bLength 18
bDescriptorType 1
bcdUSB 1.01
bDeviceClass 0 (Defined at Interface level)
bDeviceSubClass 0
bDeviceProtocol 0
bMaxPacketSize0 16
idVendor 0x19d2 idProduct 0xfffd
bcdDevice 0.00
iManufacturer 1 ZTE, Incorporated
iProduct 2 ZTE CDMA Tech
iSerial 3 Serial Number

Note down id vendor and id product some where.

2. Loading kernal module with vendor id and product id.

sudo kate /boot/grub/menu.lst --->> for Kubuntu 9.04

sudo gedit /boot/grub/menu.lst --->> for Ubuntu 9.04

In the menu.lst file add the following lines at the end of kernal line (Not in the next line)

usbserial.vendor=0x19d2 usbserial.product=0xfffd (Replace the the values with your's)

i.e.
## ## End Default Options ##

title Ubuntu 9.04, kernel 2.6.28-11-generic
uuid 36b1ffd9-709e-4587-b856-9e92d10fcd12
kernel /boot/vmlinuz-2.6.28-11-generic root=UUID=36b1ffd9-709e-4587-b856-9e92d10fcd12 ro quiet splash usbserial.vendor=0x19d2 usbserial.product=0xfffd
initrd /boot/initrd.img-2.6.28-11-generic
quiet

title Ubuntu 9.04, kernel 2.6.28-11-generic (recovery mode)
uuid 36b1ffd9-709e-4587-b856-9e92d10fcd12
kernel /boot/vmlinuz-2.6.28-11-generic root=UUID=36b1ffd9-709e-4587-b856-9e92d10fcd12 ro single
initrd /boot/initrd.img-2.6.28-11-generic

title Ubuntu 9.04, memtest86+
uuid 36b1ffd9-709e-4587-b856-9e92d10fcd12
kernel /boot/memtest86+.bin
quiet


3. Reboot/Restart your computer

4. Type the following command in the terminal

tail -f /var/log/messages

insert your modem. Now you can see entry like this...

May 25 20:44:48 sundar-laptop kernel: [ 4123.136919] usb 2-2: generic converter now attached to ttyUSB0 (Note down ttyUSB0 some where)

5. Close all terminal. Open new terminal and type

sudo pppconfig

in the new (below) window select Create and give ok...


Type provider name (say reliance) and give ok


Select Dynamic and give ok


Select PAP and give ok


Enter your Reliance Number and give ok


Password is same as your Reliance Number, enter it and give ok


Do not change Modem Speed


Select Tone and give ok


Enter #777 and give ok


Enter yes


Select Manual and give ok


Give your modem port. In my (most of the) case it is /dev/ttyUSB0


Now all set. Ensure Everything is fine. Select Finished then ok


Finally in the last wind select Quit and give ok


Now you have configured your modem successfully and all set to connect.

6. To establish internet connection type the following command in terminal...

sudo pon reliance

7. Ensuring connection is established use this command...

ifconfig

Now you should see entry like this...

ppp0 Link encap:Point-to-Point Protocol
inet addr:121.245.187.27 P-t-P:172.23.119.14 Mask:255.255.255.255
UP POINTOPOINT RUNNING NOARP MULTICAST MTU:1400 Metric:1
RX packets:4 errors:0 dropped:0 overruns:0 frame:0
TX packets:5 errors:0 dropped:0 overruns:0 carrier:0
collisions:0 txqueuelen:3
RX bytes:64 (64.0 B) TX bytes:97 (97.0 B)


Once the connection is established you can close the terminal.

8. To disconnect...

sudo poff reliance

Extra

In case if you want to monitor internet speed then install pppstatus package (sudo apt-get install pppstatus) and type sudo pppstatus in the terminal. Here is the screen shot of pppstatus...


Hope this will help some newbie like me...

Thursday, May 14, 2009

Delete unnecessary files and free disk space

BleachBit is a disk space cleaner for linux (same like Ccleaner for windows). BleachBit deletes unnecessary files to free valuable disk space, maintain privacy and remove junk. It removes caches, temporary files, cookies and broken shortcuts. For ubuntu 9.04 it is directly available from synoptic Package Manager. For other version of ubuntu you can download BleachBit from here. Installing BleachBit is simple. Open Synoptic Package Manager (System--> Administration-->> Synoptic Packate Manager). Search for package bleachbit -->> right click and select mark for installation. Once marked select apply for installation. After installation BleachBit can be find under Application -->> System Tools.

Here are some of the screenshots...


Sunday, May 10, 2009

Create Multi Live Linux Distro in single CD/DVD

After googling around for few days i found this useful script from www.multicd.tuxfamily.org. Multicd.sh is a shell script written by maybeway36 which enables two or more Live Linux distros / utilities to be able to boot from single CD/DVD. It is really very simple to create multi Live Linux distro in a single disc. Create a folder in your home folder (Places--> Home folder) and name it as multicd. Put all the live Linux iso images along with multicd.sh script inside multicd folder. Close the window. Open terminal (Application -->> Accessories -->> Terminal)
and give the following commands

cd multicd
chmod +x multicd*.sh
sudo ./multicd*.sh

Above commands will execute multicd.sh. While executing, this script will download few packages from Internet and make a new iso image called multicd.iso for you inside multicd folder. Check the size of multicd.iso image file. If it exceeds more than 700 mb then you must insert DVD to write it. Choose burn image option from your favorite image burning software to write multicd.iso file. Upon reboot, with the CD/DVD present inside CD/DVD drive, new GRUB will display list of live distros available in the disc. Choose your favorite one to login...

Note: When you download any Linux iso image from internet it will look like this "ubuntu-9.04-desktop-i386" but this has to be renamed as ubuntu.iso (inside multicd folder). Presently this script supports 20 live distros. List of Live Linux distros supported in this script are given below (and the names accepted by this script are on the right side of each distro).

Ubuntu Live CD → ubuntu.iso
Linux Mint → linuxmint.iso (cannot be on the same DVD as Ubuntu)
Knoppix → knoppix.iso (Versions 5 and 6 supported. If you use the DVD version, KNOPPIX2 will be dropped. You can also use the 5.3.1 Japanese Edition if you prefer KDE.)
-customized-
Debian Live → binary.iso
-compilation-
Ultimate Boot CD → ubcd.iso
-very small-
DSL → dsl.iso
Tiny Core Linux → tinycore.iso
Puppy → puppy.iso
Feather → feather.iso
SliTaz → slitaz.iso
Austrumi → al.iso
GeeXboX → gbox.iso
-rather small-
Slax → slax.iso
Slax modules → *.lzm
DeLi Linux → deli.iso
TinyMe → timyme.iso
anitX → antix.iso
Wolvix → wolvix.iso
-partitoning and specialized-
RIPLinuX → riplinux.iso
SystemRescueCd → sysrcd.iso
Trinity Rescue Kit → trk.iso
Parted Magic → pmagic.iso
GParted Live → gparted.iso (can't be on same CD as Debian Live)
Offline NT Password & Registry Editor → ntpasswd.iso
EASEUS Disk Copy → diskcopy.iso
Clonezilla → clonezilla.iso
PING → ping.iso
-installers-
NetbootCD → netbootcd.iso
(versions 2.x and 3.x supported) Ubuntu (hardy or intrepid) mini.iso → ubuntu-mini.iso
Debian (etch, lenny or sid) mini.iso → debian-mini.iso
Fedora 9 netinst → fedora-boot.iso
openSUSE NET iso → opensuse.iso
Mandriva boot.iso → mandriva-boot.iso
Arch Linux FTP or CORE → arch.iso
FreeDOS base or full CD → fdbasecd.iso/fdfullcd.iso
-utilities-
Any floppy disk image → *.img or *.imz (could be Super Grub Disk, MS-DOS, etc.)
Any floppy disk image → games/*.img or games/*.imz (for bootable DOS disk images with games, like this one)
GRUB4DOS grub.exe → grub.exe
DBAN iso image → dban.iso
Balder (FreeDOS) → automatic
Memtest86+ → automatic

Any doubt and queries contact author through this mail id maybeway36@gmail.com (he does reply) and participate in this ubuntuforums thread http://ubuntuforums.org/showthread.php?t=1071869

Drag panel - Ubuntu 9.04

Just installed Ubuntu 9.04 in my friend's laptop. He is not comfortable with the top panel and wanted it to be bottom along with other panel. Normally it can be done by dragging with your right mouse button clicked or right click -->> select an option move. But this same trick wont work in Ubuntu 9.04. Instead you must press Alt and drag the panel. Found this short cut today :-)


Tuesday, May 5, 2009

Useful Linux Links

Here are some of the useful Linux links which I read often. Posting all the links here thinking that it may help others. This is also good place for me to store all the links :-))

Note :: If you know any other useful links please add it as comments.

http://www.google.com/linux --->>Best Linux search engine on the net

http://distrowatch.com/ --->> All about distribution

http://linux.softpedia.com/ --->> News, Review, Download...

http://www.linuxlinks.com/ --->> Great link for Linux...

http://www.tldp.org/ --->> Linux documentation (download books from here)

http://tuxradar.com/ --->> Linux review and latest news...

http://www.linuxnewbieguide.org/ --->> As the name suggests good for Linux newbies...

http://www.linuxformat.com/ --->> linux News, Review...

http://www.linuxdevices.com/ --->> Review, News, Articles....

http://www.desktoplinux.com/ --->> Review, News, Articles...

http://www.pendrivelinux.com/ --->>Put your Linux in to pendrive...

http://multicd.tuxfamily.org/ --->> Create Multi Live distro in single DVD/CD

http://www.linuxtoday.com/ --->> News, Review, Articles...

http://www.linuxjournal.com/ --->> Linux tips, Review, News...

http://www.linuxsecurity.com/ --->> Linux & Security...

http://www.linuxquestions.org/ Ask your Linux related question here...

http://iso.linuxquestions.org/ --->> Download Linux iso from here...

http://freshrpms.net/ --->> RPM collections...

http://slashdot.org/linux --->> News and review

http://www.justlinux.com/ --->> Linux forum

http://www.linuxfromscratch.org/ --->> Downloads, News, tips...

http://www.livecdlist.com/ --->> Download live cds...

http://www.howtoforge.com/ --->> Linux how to tips and tricks...

http://linuxbasics.org/ --->> Tutorial...

http://www.linuxselfhelp.com/ --->> Good site for Linux tutorial...

http://www.linuxalt.com/ --->> Windows software and its Linux equivalent...

http://www.reviewlinux.com/ --->> Find Linux reviews, how to...

http://danlynch.org/blog/ --->> News, reviews, tips...

http://www.linuxplanet.com/linuxplanet/tutorials/ --->> Tutorial, review, tips....